Tuesday, December 6, 2011

Matching Card - Of Course

Well, I had to make matching cards for my Christmas gifts (look here) didn't I.

I can't (or at least I HATE to) give a card that doesn't match the gift.

Especially if its a home made gift.

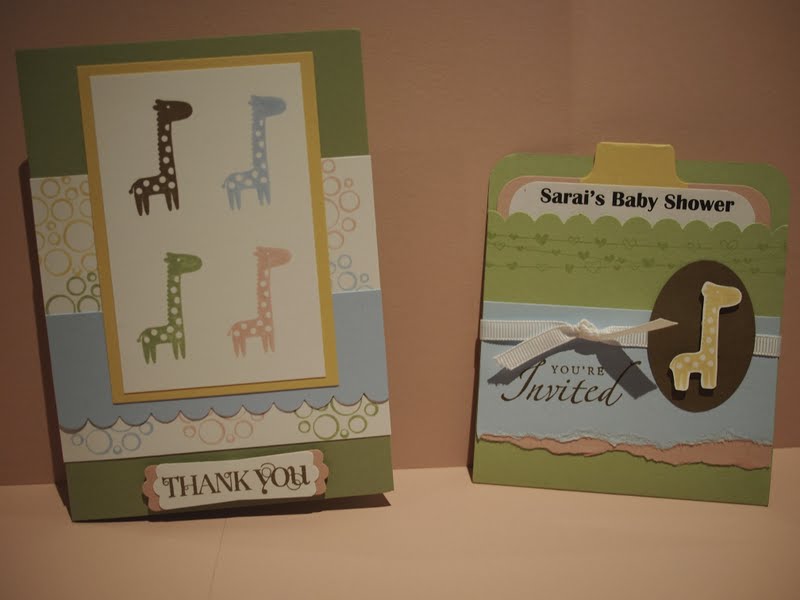
So here are the cards I made to go with my Embellishment Folders...


Very simple I know - I had about 30 minutes to make 3 cards and I was starting from scratch with no ideas other than the colour scheme (ie. it had to match the gifts).

I remembered a card from Kirsty Brown's blog (AGAIN) and took my inspiration from there...

I love the Blushing Bride and Crumb Cake together, and absolutely LOVE those snowflakes - I use them every year! (from Snow Swirled).

I have also used the new Embossing Folders 'Designer Frames' - LOVE - these are gorgeous. Though I am finding when I use mine they leave a ridge on my card stock that I'm not liking - I'm trying to figure out a way to eliminate this...


As I said, very simple and very quick. I am thinking I might make these as my Christmas Cards this year, so I might have another play and see if I can step them up at all - you know, a cards not a card unless its taken hours to create - hehehehhe. Only joking. I think this ones pretty effective in its simplicity.


Its those snowflakes.

Those snowflakes make me happy! :) :) :)

Thanks for stopping by,

Smiles

Adele xxx

Monday, December 5, 2011

Christmas Specials!!!

Wow - you will never believe it, but Stampin' Up! have just put out a list of stamps and accessories that are up to 50% off!!!!!!!!

Merry Christmas everyone!!!!

You can link to the list here and let me know if there's anything I can get you - the perfect time to buy a gift for that creative person in your life, or just simply stock up your supplies.

You can contact me on adlewiess@yahoo.com.au if I can help you in any way!

Thanks so much for stopping by,

Smiles

Adele xxx

Presents!!!!!!

'Its beginning to look a lot like Christmas!'

I am so excited this year. Normally Christmas isn't something I'm that into - but this year I haven't been able to wait.

So it was so exciting that my sister and her family were able to travel up from NSW so we could celebrate Christmas together as a family - 11 kids and 8 adults in my parents house - it was awesome!!!!

I decided a little earlier in the week to 'make' some gifts for my sisters (Kylie, Estelle and Lisa) adn procrastinated till the day before (why oh why do I do this to myself???) and made these little folders.


I saw the original idea for these gorgeous things on Amy's Blog in  a 2009 post (can't find it now for the life of me??) and thought they would be perfect!

Aliessa also made one of these - here is her version...just scroll down to the bottom of the post...

Amy did have a template for it which she was lovely enough to share - go to http://www.papertreyink.com/mtt_recipewrapup_webview.html to find it...

For mine, I actually just scored 2 pieces of A4 cardstock at 8cm then again at 9cm twice, and trimmed the end a little so that I had an overlap of 2cm, and then glued the 2cm pieces together - probably a little longer than the one in the template so I could fit more stuff in!

Then you just use some acetate (mine were OHT sheets) and Crystal Effects to adhere the die-cuts - I had already put Dimensionals on them all and the Crystal Effects on the bottom of the Dimensional - so they should just come off really easily...


Then I followed Amy's idea in filling this little folder with pre-made die-cuts! How awesome is that! I would LOVE to have a gift like this - things that you can just pull off and whip onto a card - how quick would that be. 


I'm really hoping they get some use out of them..


So what crafty things are you making for your gifts this year?

Thursday, November 24, 2011

Kirsty Brown Case

Hello lovelies - back again with a CASE this time - I love Kirsty Brown's craft and find her so super inspiring, and when I saw THIS card I just knew I had to have a go at making one myself...

So here is my version...


I love Marina Mist and have used Cherry Cobbler, Old Olive, So Saffron and Peach Parfait to compliment.

Its a dreary, rainy day here today - the perfect day to CRAFT!!!!!

Hoping you're finding some time of your own to make beautiful things.

Come again soon,

Smiles

Adele xxx

Monday, November 21, 2011

HAPPY BIRTHDAY

Just another quick little post to say HAPPY BIRTHDAY to my lovely lovely friend and partner in all things paper-crafty - LISA!!!!!!

Really really hope you have a lovely birthday today my friend - I am so grateful to have someone close by that understands my crazy love for paper and glue - I LOVE sharing it with you!!! You are just the best - so wonderfully inspiring, and your 3D projects especially blow me away.

Big hugs, kisses and birthday wishes!!!!!

Love
Adele xxx :)

Christmas Crafts

I have a fun little project to share with you today - this idea kind of just hit me out of the blue and I'm so glad it did because I LOVE how its turned out!!!! :)

I started with a pile of wood looking like this...


and ended up with them looking like this!


I have been holding onto some remnants of Christmas DSP from two years ago for the perfect project and thank goodness I had enough to do this - they have been my fav set of Stampin' Up! Christmas papers ever so I'm so so happy that I'll be able to look at them every year from now on! hehehhe

So the idea with this Advent Calendar is that under each block is attached an activity for the day. Once we've completed the activity for the day the block can just be turned around so just the paper is showing. I'm still undecided whether to leave them lined up in order like this or to make them a little random and all over the place. It will probably depend on where I decide to place it - its where it is at the moment just until I decide what to do with it - oh - and waiting till the first of December would probably be a good idea too!!!! hehehhe

I'm so excited for Christmas this year and have so many ideas floating around in my mind of things to make - so hopefully I'll have more to show you over the next couple of weeks.

And here are just some close up shots of some of my favourite blocks...


I can't actually tell you where this wordy paper comes from - it was just in my stash but is one of my absolute favourites!!!! I love blue in Christmas things...


How gorgeous is this sparkly green design - yum yum yum!!!


And here's a row of some of the papers all together - they just co-ordinate so perfectly. I LOVE it!!!

The blocks are all slightly different sizes which I am loving too - it all adds to the random-ness of the project.

And just to end I thought I'd pop on a little photo of my sleeping beauty - getting so chubby now and just so much fun with the smiling and little chats we have sometimes. We are so blessed with such a gorgeous gorgeous baby girl...I love her to bits!!! :)


Thanks so much for stopping by, and come again soon! :)

Have the best day!

Smiles

Adele xxx

Sunday, November 13, 2011

Old Craft

Well, in an effort to be a more regular blogger I thought I'd share with you some craft I made a little while ago.

One of my closest friends was celebrating her 30th birthday and I wanted something a little special to give her, and had heard of the idea of a money tree where you give a $1 for every year of their life. So I set about making my own version...

I could NOT figure out a way to photograph it - this was the best I could do!


Basically a tree branch stuck in a pot of clay and made to look pretty. I did my very best to make it look as pretty as possible though. :) I made these little pouches to slip the coins in using the heart punch and some ribbon, and hung them on the branches...and made lots of these little flowers as well.


And this was the matching card - a CASE from the IB&C with my own take on it.


A rather impractical gift perhaps - really just fancy packaging, but lots of love went into it and it was fun to make, and most importantly pretty to look at! :)

My husband is away on Senior Camp this week so I am looking forward to less housework and more crafting!!!!!! While the cat's away the mouse will play right! :) :) :)

Thanks for stopping by and have a fabulous week!!!

Smiles

Adele xxx

Thursday, November 10, 2011

Regionals

Ok - I PROMISE that I will be a better blogger here on out!!!! This year we have been SHOCKING and it has to stop! hehehehhe.

And to start the ball rolling I thought I'd show you some photo's of the swap card I made for the Brisbane Regionals last weekend...


Really bad photo's I know - I still haven't sorted out a good place for taking photo's...


Anyway - this is the green version - I've used Always Artichoke - and can I say I LOVE this green for Christmas - so lovely and deep and subdued. Paired with Cherry Cobbler and Very Vanilla - I really really like this colour combo.

So - its a Always Artichoke base. I've added an embossed layer and then used the new Log Cabin Smooch Spritz on the background - on the green it looks more like the spritzer tool, but on the red the lovely glittery-ness really shows through.

To that I've added a Top Note using the new First Edition DSP (LOVE!!!!) on which I have stamped the family image from 'Season of Joy' and then I have glued over the top a Vellum Top Note onto which I have stamped the wreath image from the same stamp set. I have used a pen to colour in the little berries. I really really liked the effect - just nice and soft. Finish it off with some flowers and that yummy yummy seam binding ribbon and I was done.

And here's the red version...


I did alternate the colour of the sentiments but other than that the two are exactly the same. I made 40 of these and was thoroughly sick of them by the end. :)


And this is the only action shot I got on the day - Lisa will KILL me for sharing it but it was the only one! :) Lisa took lots herself so hopefully she'll be able to share a few soon. :)


Thanks so much for stopping by and I PROMISE to be back again soon!

Have a great weeks end!

Smiles

Adele xxx

Tuesday, October 18, 2011

Catching Up

So it has been an AGE!!!! So much has happened in the past couple of months and I am still trying to recover from it all!

Firstly, we had our beautiful baby girl on Tuesday 20th September, at 3.41am. She is perfect and just so so beautiful - I am totally in love with her. We named her Emersyn Marie and she is a little sweetheart. Growing so so quickly though - I wish you could just hit the pause button for a little while...


 It was a fairly normal labour (ie. painful!!!!!) and I had so much on my mind at the time that is was hard to concentrate on what I needed to do (getting the baby out!!!!) - hehehehe - see, we were moving house the next day and Tuesday was meant to be my mega packing day and here I was in hospital not able to help at all with all that needed doing at home!?!?!?!?! Of course having a baby was much more important, but I would NEVER recommend having a baby and moving house anywhere in the same month, let alone the same week! I was so exhausted from all the packing and the extreme discomfort of being hugely pregnant and not able to sleep or move! :) Thank goodness for my wonderful husband, parents and parents-in-law and some lovely ladies from church who finished packing for me.

They sent me home on the Wednesday afternoon and my husband drove us all to our new house - an hour away. Thank goodness all the big furniture was in its place - all we had to do was throw sheets on the beds and put the kids in.

So all in all a totally eventful week. All I can say is paying for removalists was a life saver and something we will DEFINITELY do next time we move!

So - yes I have crafted a little over the last few weeks, but as my camera power cord is still packed in some random box somewhere I haven't been able to recharge my camera to be able to upload photo's. I will post some photo's of our new house as well once I can locate it.

And other exciting news - Lisa and I are attending the Regional Seminar in November!!!!!! Super super excited but totally freaked out about swaps!!! Anyone out there have any advice/guidelines we should follow?? So looking foward to getting to meet some local stampers as well and really get back into the groove of crafting frequently - its been one hell of a year!

Thanks for bearing with me through such a looong post - come again soon and I promise to have some craft to show you.

Have the best day!
Smiles

Adele xxx

Thursday, September 1, 2011

New Catalogue!!!!!!

Its HERE!!!!!! The GORGEOUS, BEUATIFUL, EXCITING new Catalogue!!!! You just have to go and have a look at this - so many yummy yummy things to drool over and ad to that never-ending wish list (if you're like me?).


Look at that gorgeous cover - I love all these colours together and can't wait to get to work CASEing a few/all of these awesome creations. Follow this link to view the catalogue in all its loveliness on-line or contact me if you'd like to purchase your very own copy!!!!!!

There is also an amazing promotion being run for the month of September - Join Stampin' Up! as a demonstrator for only $169!!!!! How awesome is that...


And this is what you get in the Starter Mini Kit...


Many of these things are also interchangeable if you have something else on your must have list.

Alternatively, if you're wanting to purchase the full, regular Starter Kit you can do so for 20% off!!!! That's only $231.20!!!!! How awesome is that - especially as you get over $600 worth of value!


So many new and exciting things happening at the moment - so if you're interested in ANYTHING contact me either on adlewiess@yahoo.com.au or 0403 545 602. I would love to help you out ;) 


Thanks so much for stopping by,

Smiles

Adele xxx

Saturday, August 27, 2011

Retired List

Hello lovely friends - it has been an age!!!!!! I am so sorry but have to say crafting has not been a huge priority as my body prepares to deliver another baby - I am feeling OLD!!!!!!!! hehehehehe.

I just thought I'd pop on here and post the Retired List for retiring Stampin' Up! Products - that's right - the new catalogue goes live NEXT WEEK!!!!! Very very exciting hey! So if you're interested in having a squiz pop on to this link and click on the Retired List button and it will take you to a PDF file with the list of dissappearing products - that's right - they'll be GONE FOR GOOD!!!!!

So there's still time to let me know if there's something you just must have - and some of the items are discounted too which is always awesome!

If you're wanting to order anything you can email me on adlewiess@yahoo.com.au or Lisa on lisajguy@hotmail.com

Thanks for still being there!!!

Smiles

Adele xxx

Saturday, July 9, 2011

Another Class Card

This is the fourth card we made at our Stamp-a-Stack class last week...


I don't think this is in my normal style, but I actually really like the busy-ness of it. We created the background by using the Musical Notes Standard Wheel and then stamping that lovely large bold Baroque image over the top. Add some DSP, a lovely paper flower, and a sponged chipboard letter and you're pretty much done.

And I have to say I'm loving that gorgeous rich Concord Crush too! Yum Yum

Smiles

Adele xxx

Thursday, July 7, 2011

Impressions Magazine Case


This is one of the cards we made at my last Stamp-a-Stack class - totally CASEd from a recent Impressions Magazine edition. I loved the look of the card when I saw it in print but didn't think more of it till I watched the tutorial on Stampin' Connection (a forum available to Demonstrators - seriously an AWESOME place to recieve inspiration - you are definitely not left to your own devices when you join the Stampin' Up! family - you should give it a try :) :) :) It looked super achievable and is truly stunning - I can't wait to try this same principle in different colours and stamps...


So what is it? Its a fabulous use of our Shimmer Paints and they are BEEEA-U-TI-FUL! You stamp the main image in the colour of your choice, clean your stamp, and then sponge on the Shimmer Paint of your choice, stamping it over your original image. Here I have used Champagne Mist and I LOVE the soft shimmery-ness of it.  Of course the photo's don't do it justice...:)


I LOVE that Crochet Trim as well - hopefully it will make a come back and we can have it all the time!

Thanks for stopping by - I have a couple more posts coming up so be sure to come back again in a few days and I'll have some more eye candy for you!

Smiles

Adele xxx

Tuesday, July 5, 2011

A Work In Progress

I've started a present for a special someone and am a little lost as to how to complete it, and thought you'd all have some fabulous ideas for me! :)

Its a 9cm x 9cm wooden block and I've covered all four sides with a photo of the kids and my husband and I. I love the effect of the four sides, but have put DSP paper on the top and had thought to put a flower on the top - but it looks a little bit like a muffin and I'm not sure I like the introduction of the colour against the black and white photos. I love the rawness of the wood and black and white images...

What do you think...


I'd like to get some rub-on's to put over the photo's but am stumped as to what to do to the top, if anything?

Can't wait to hear your ideas - I'm sure they'll be the perfect solution...

Thanks for your help!

Smiles

Adele xxx

Wood Blocks Class

Hello lovelies - just popping on to show you a variation of the photo wood block we'll be doing in a class this Saturday evening. Here is the original block...and here is the variation...


I've tried to keep this one relatively embellishment free as I'm still deciding whether its masculine enough to give to my husband for his upcoming birthday??? I've also added the word which I kind of like - it makes it have more of a scrapbooking feel...

If you're interested in making one of these for yourself the class details are

THIS SATURDAY 9th July

7.30pm @ my house

$15 - you will need to supply your own picture obviously :).

RSVP: This Thursday 7th July

I made one of these for my mother's birthday on the weekend and used a colour photo and it worked just as well - I loved the colours and brightness of it. If I can I'll try and get a photo of it before the week is out, so you don't have to use a black and white if you don't want.


Have a great week and hope to see some of you soon! :)

Smiles

Adele xxx

Friday, July 1, 2011

Baby Shower


I know I haven't contributed anything for months...but I'm slowly getting back into everything after being away overseas with my husband and daughter on our trip of a lifetime! We had such a blast but are well and truly back to reality and normal life.
My sister-in-law is having a baby any day now and a few weeks ago I hosted her baby shower. I actually made the invites before we left on holiday and then had the party 1 week after we got back. She loves giraffes and doesn't know if she is having a boy or a girl so I decided to make everything multi-coloured!
I carried the animal theme through the invites, the decorations and the thank you cards. I even made some paper bunting which was very easy and quick. From her party I have been asked to make invitations, cake toppers and more for a little boys 1st birthday party so when I complete those I will post some pictures.
I have fallen back in love with the Fox and Friends stamp set! I also love the word set Curl Cute, which is where the 'Thank you' on the thank you card is from.

Hoping to post more soon,
Lisa xxx

Saturday, June 11, 2011

Candles!

So I have JUST finished this little project of mine in time for Church tomorrow, and its night time and my night time photo's suck, but I just HAD to jump on here and share a photo or two with you...


So why am I so excited you ask??? Its just a stamped candle? We've all seen these before right? Well - you probably can't read the words on these candles because the photo's are (pretty) bad, but they don't come from a stamp. They are a scripture that goes with the lesson I am teaching tomorrow and I just had to figure out a way of getting it on to that candle.

So how did I do it you say? You may be clever enough to have already thought of my method, but for me it was a lightbulb moment.

I typed up my words on the computer, and then got an OHT sheet and printed it on that. As soon as it came out of the printer I whipped it on to a waiting piece of tissue paper and used my bone folder to moosh the ink onto the tissue paper. It comes out backwards (do you get me - looking at it from the printer the words are the right way round, but when you place it on the tissue paper you want the inked side to go down, so when the words are 'stamped' they're backwards). Then I proceeded with the normal method of decorating a candle. You can find an awesome tutorial here from Splitcoast Stampers.


Fun hey. I'm really really happy with how they've turned out and think they make really cute hand outs. Best part yet - they were on sale at Target so I got them for next to nothing. Got to love a bargain.

Now that I've done it I will DEF be doing these again. Wouldn't they make gorgeous gifts? And now I know I'm not limited to the stamp sets I own - I can type out anything I'd like!!!!! YAY!!!!!

Thanks so much for stopping by,

Smiles

Adele xxx

Thursday, June 9, 2011

Name Blocks

Another set of name blocks - these ones for an ADORABLE little boy named Hugo! I've taken far too long to make these ones - little Hugo is almost 3 weeks old - doesn't time fly! Anyway - these are 7cm x 7cm, covered in Baja Breeze DSP from the last catalogue and I've also covered the Chipboard letters this time which is a first - normally I just paint them white or vanilla, but I felt this time I needed to do something more, and I really like the effect. Hugo has the most gorgeous (!!!!) retro knit blanket and it kind of inspired me with the blue and brown together.


If you have any questions just shoot me an email and I'll answer asap.

Thanks so much for stopping by - come again soon!

Smiles

Adele xxx