Monday, May 31, 2010

Stamp-a-Stack Class Cards


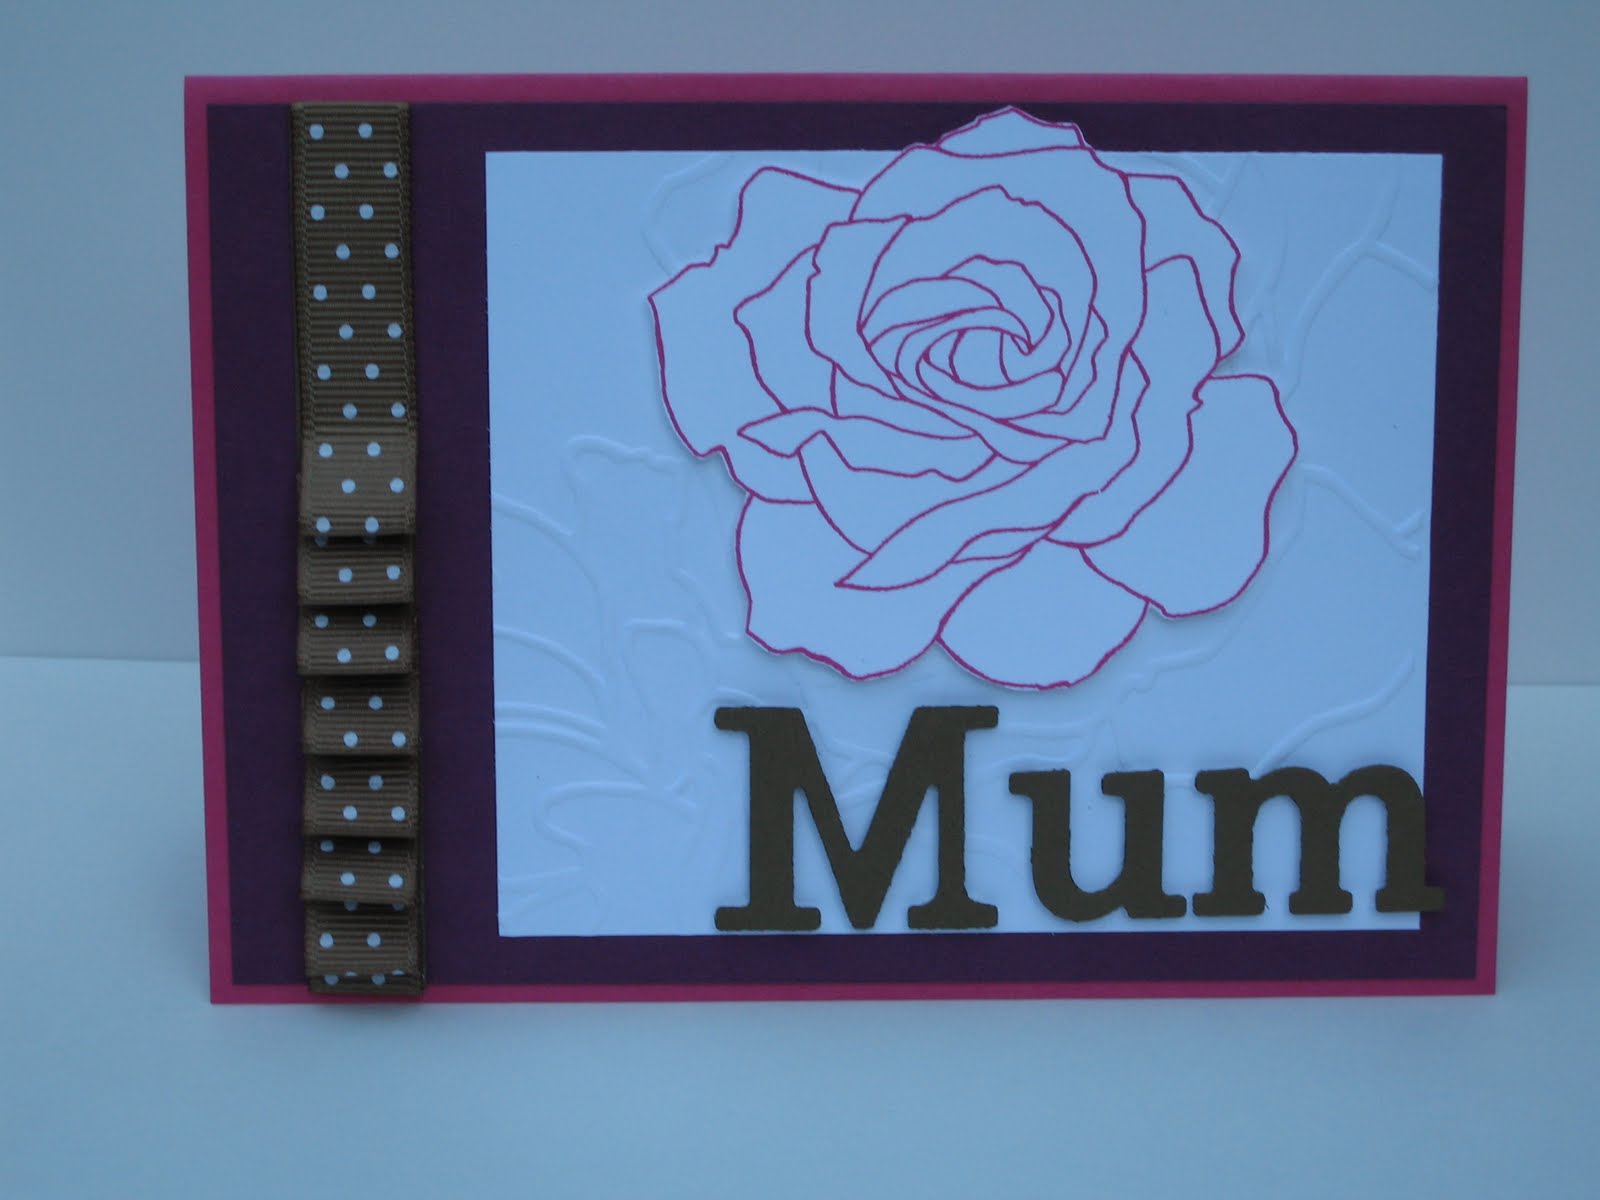
Happy Monday everyone!!!! Just thought I'd post the four cards that we'll be making at our Stamp-a-Stack class this coming Saturday night. Cost is $15 to make 2 cards of each of these four designs which is really really good value! This class is open to anyone and EVERYONE crafty or not - come along and enjoy some good company and the opportunity to make some really cool cards too!

Payment needs to be recieved prior to Saturday in order to secure your seat. I can give you those details once you've contacted me about attending - you can do so either by leaving a comment or sending me an email (which you'll find to your right). If you'd like to purchase the lovely Stampin' Up! envelopes to go with your cards it will be an additional $5.

Really REALLY hope to see you there!!!

Smiles

Adele xxx

Friday, May 28, 2010

20% OFF Stampin' Up! Starter Kit

Hello friends!!!! I just had to tell you all about the most awesome promotion Stampin' Up! is running at the moment - 20% off their Starter Kit!!! This means that instead of paying the regular $324 you now only need to pay $259 which is amazing value! The retail value of the starter kit is $560 worth of product, so you would be getting a whopping 55% off!


How awesome is that!!!


There is no pressure to sell lots and lots of products either - you are more than welcome to benefit from the 20% demonstrator discount yourself. You can stop whenever you like or you might find that you are so in love with the product that you can't HELP but tell anyone and everyone about it and benefit from all the AWESOME rewards available to demonstrators!


Whatever level of committment you want to give is fine with us...but this deal is too good to pass up so why not give it a go.


If you want to see what's included in the Starter Pack just click here - you'll find lots of other useful information as well!


You can contact Lisa or myself if you'd like more information, but for all of you out there who don't know where to start with you Stamping supplies this kit would be perfect for you!

Hope you hear from you soon!

Thanks for stopping by!!!

Smiles

Adele xxx

Monday, May 24, 2010

Buttons Blog Candy

Yay for Blog Candy!!! For those of you who didn't see my post from yesterday I offered some blog candy for the first person to email me the correct number of times I had used the word 'button'!!! (there were a few!!!) - thank you to all who participated!!!!) Even though I did get a few attempts at guessing the first person to count the correct number was
SARAH CORNELIUS who guessed 15 times!!!!!! That is the correct answer!!! I used the word 'button' 15 times!!!! :) That's quite a lot of usage for the word don't you think? heheheh

Thank you very much to all who participated - I've had so much fun with this little challenge I will definitely be doing blog candy again so keep checking back!!!

Sarah - I will be getting you your pack of cute as buttons asap!

Thanks again everyone!
Smiles

Adele xxx

CLASS DATES

Hello everyone, FINALLY we've got some dates down for classes we'd like to hold in the next couple of months. If you look to your right you'll see I've listed all the dates down the column -just look for the header 'Class Dates'! Feel free to contact us and reserve your place in any of these classes now!!!! As the date gets closer I will post more specific details and examples of what we will be making.


You can phone or email either Lisa or I to reserve your place. Classes are limited to 8 people per class and a minimum of 4 people for the class to go ahead. All materials are provided unless we let you know otherwise.


If these times don't suit feel free to get a group of friends together and have a class at your place instead! We'd love to share our wonderful products with you and our favourite thing to do is classes classes and more classes!


Hope to see you all very very soon!


Smiles,

Adele xxx

Sunday, May 23, 2010

One More Post


So one more post for tonight - I have been holding onto these two cards for a little while because I've actually sent one to a lovely lovely lady who sometimes frequents this blog (wave wave!!!!) and didn't want to give anything away until she'd recieved her little package, but I can't wait any longer because I really really like these cards...


These are both using the Vintage Vogue stamp set from the current mini - this is SUCH a fabulous stamp set - so very very VERSATILE and BEAUTIFUL and EASY to use...the card pretty much just makes itself.

I've started with a base of Natural's Ivory which I only bought after seeing how much Kirsty Brown uses it (I actually didn't even realise this cardstock existed till seeing this post) and I LOVE it - it is so lovely and natural and organic looking/feeling - then I've used a layer of Baja Breeze.
On the first card I have used the Medallion Stamp as a background, on the second card I've run the wheel that matches the Vintage Vogue set along the cardstock in versamark (have I told you how much I LOVE versamark as well!!! hehehehe). The rest is pretty much just stacks of the flower images from the Vintage Vogue stamped once, twice and a third time to create the different depths of colour in Baja Breeze and Sahara Sand, stuck together and a pearl or crystal stuck in the middle.

I love the very vintage-ey feel of these cards - I had a great time making them, and I really hope their recipients enjoy them too!!


Thanks for coming by!!!!

Smiles and more smiles,

Adele xxx

More Circle Circus


Another card using Circle Circus - on the background stamped in versamark. I AM happy with the effect but these two particular stamp images don't fit quite perfectly together - but hey, that's ok isn't it??? :)


I tried a new type of flower - a tutorial for it can be found here on Betsy Veldman's blog (doesn't that name just sound like craft/homemaking/sewing/sugar and spice and all things nice!!! Well, her blog is AMAZING!!! Check it out!) I love it and can't wait to try it in material and other mediums like Betsy's done. My favourite thing on this card is the fact that I've actually threaded the button on to the cardstock rather than just tying the bow on the button and then using glue dots or Pritt to stick the button to the cardstock. This time I actually punched two small holes in the centre of my base cardstock and threaded the twine up through those and then through the button, so when I tied the knot it actually pulled the button closer to the flower?? Does that make sense?? I got this button threading idea from Betsy as well. It just makes the button sit so much more flush with where its being placed rather then bobbing up a little bit and being skew-iff (if you look at the button's on my Chipboard Gift Bag you might notice these button's aren't sitting quite right - that's because the twine underneath the button stops the button from sitting flat. Get it?)


Anyway!!!!


So I have some blog candy for you (something new for me too!!!) The first person who can email me (you'll find my email address on the side bar to the right) and tell me how many times I've used the word BUTTON in this entire post will get a pack of Stampin' Up! buttons (either the Button Bouquet or Button Latte set which can be found on page 151 of the catalogue!) So good luck to you all!!!! hehehehe
(Would it be ok if only non-demonstrator's participated in this little challenge - that way we can spread the Stampin' Up! love around...:o)

Thanks so much for stopping by and PLEASE come again soon!!!


Smiles


Adele xxx

Circle Circus


So I borrowed Lisa's Circle Circus stamp set to have a play with (yes, it is STILL on my wishlist!!!) and this is one of the designs I came up with - I was in the mood for something clean and simple and I think this one is just that - simple simple simple!! All it uses is the Circle Circus stamp set, a circle punch and some ribbon pretty much. Don't you just love that ribbon though - its to die for!!! Unfortunatetly its out of our last mini so not currently available (I forgot that until right at this moment - SORRY!) but I really really like it - similar to the polka dot ribbons in the current mini catalogue in the new ink colours (Melon Mambo, Soft Suede, Rich Razzleberry) - who can resist such gorgeous ribbon!
This layout could easily be adapted to any colour scheme or stamp image don't you think?? :)
Thanks for stopping by,
Smiles,
Adele xxx

All In The Family


How bright and happy is this colour combo - Baja Breeze, Kiwi Kiss and Melon Mambo!! Love it!!! This is a really cute stamp set too - All In The Family - so much fun to 'build' your little person and then to colour in. Here I've used blender pens and ink from the lids of my ink pads.
I've also used the Calendar Alphabet and Numbers stamp set to create the lettering - its not totally centred but I didn't think it mattered too much because of the casual layout of the card?
The scalloped border around the edge of the circle (cut out using my Big Shot) was created using this awesome (!!!) idea from Marelle Taylor - she never fails to have some great idea to try out and this is a great one - you should give it a go yourself!!! :)
I know this card isn't perfect and has lots of 'mistakes' but I still like it?! :)
Thanks for stopping by,
Smiles,

Adele xxx

Wednesday, May 19, 2010

Chipboard Coaster Bag


Hello long lost friends! Its feels like forever since I've last posted (i know it hasn't been that long but it FEELS like it!!!)


I thought I might go into my Stamp Tutes file that I have on my computer and pull out a 3D project to have a go at...and this is what I found...a Chipboard coaster box! You can find the tutorial I used here. I really really like it because its very very sturdy and just a great box. I picked the chipboard up from a craft supply store near my home for $1 per 12 x 12 sheet which I was pretty excited about - MORE excited to find I could run the chipboard through the bigshot using the Top Note and Scallop Circle dies....I can't wait to try making my own mini chipboard album, but basically I chopped up my chipboard rather than use the pre-made coasters that are used in the tutorial - I was trying this at night and just had to make do - to round the corners I just sanded them with my sand block and it worked really well.


So I've used the gorgeous gorgeous Haiku papers - I LOVE these papers and have just used the last of my packet making this - def time to order some more!!! I've also used the Asian Artistry alternative hostess set from the mini catalogue - I LOVE this set too!

I'm a little dissapointed with the flowers on the front of the box - I've stamped them in Soft Suede and then used blender pens and my So Saffron pen to colour the images, but I really wish I had stamped off the Soft Suede first to make the outline more muted, but I've run out of time so it will just have to stay the way it is!!! At least I got it right on the notecards!!! :)

All the rest is pretty self explanatory - if you're interested in trying this and would just like straight measurements rather than having to watch the tutorial just shoot me an email and I'll jot them down for you!


Thanks so much for stopping by,

Smiles
Adele xxx

Sunday, May 16, 2010

Covered Books

So my daughter wanted a quick, inexpensive gift to give her friends for their birthdays. She is in year 12 and soon she and her friends will be leaving school and will want memories of their last year together. I thought covering ordinary exercise books (the 320 page type) to make them cute and then putting a plastic cover over them to protect them would be something any girl could use to collect pictures in and use as a 'sign' book at the end of the year.
This is my first attempt and it worked out ok I think?! Anyway there will be lots more to make, so I should get it right eventually.
Lisa xx

Monday, May 10, 2010

Gift ideas


I loved making these matching notebooks and post-it note books....I think I will be making lots more throughout the year. They are both so simple and cost effective...Yay!!
Lisa xx

More Mothers Day Cards


So here are the different Mothers Day cards I made....I made 5 because I give presents to my mum, mother-in-law, and 3 grandmothers!! I like them all.
Lisa xx

Sunday, May 9, 2010

Mother's Day

Happy Mother's Day to all you lovely women out there!!! I really hope you've had a fantastic day with lots of cuddles and kisses and appreciation for all your awesomeness!!! My day has been pretty amazing - I woke up to breakfast in bed, a pretty cruisey morning with my husband at home (he's not usually home on Sunday mornings due to Church responsibilities) and then I got to go to church with my family and give a talk on the 'Blessings of Motherhood'. I really needed that talk - to remind me of all the amazing wonderful things about motherhood! And I'm feeling pretty good about the whole motherhood thing as a result!?!? :)


Anyway - I wanted to share with you the gift I made for my mum - now, I only used one Stampin' Up! product on this project which was Chocolate Chip ink for sponging but I am really happy with how these turned out...


You may have seen this type of thing before - a friend of mine does these blocks of wood and scrapbooks them - they look really really cute and the possibilities are endless! My mum and I saw blocks like these in a little shopping town called Berri at Christmas time and mum fell in love with them and wanted to buy them - I think they were going for $70 or so - and I wouldn't let her because I knew I could make something just as good for much much less!!! All up this gift probably cost $20 - the wood blocks are just a plank of wood from Bunnings (our local hardware store) which they will cut into whatever size you like, with scrapbooking paper glued on top and sanded and sanded and sanded. Chipboard letters painted with distress paint and inked with the said Chocolate Chip ink around the edges and over the top finish the vintage-y effect. My mum is really musical hence the music paper. All in all I really enjoyed this project and almost wish I could have kept them for myself!!!
I will MIA for the next little while - our computer is going into the shop and I am sure we're going to end up having to get a new one, but I promise to work on lots more projects so I'll have something to show when I get back!!!
Hope you're smiling!
Smiles
Adele xxx

Monday, May 3, 2010

Bright Birthday

I feel like I haven't created for AGES!!!!! This is one I've pulled out of my files - CASED from Sarah van den Berg when the creative flow was low...added a few different tweaks like the Big Shot Polka Dot panel and the colours - I actually LOVE these bright colours together - so fresh and happy...and that stamp set has become a MUST have!!!!

Hope you've all had a wonderful weekend,
Will be back with more asap!!!!

Smiles

Adele xxx