So these are the sweet little things I was spending my time doing yesterday - seriously, they took all of 10 minutes to do 2, and I really like them. Possibly because I LOVE Greenhouse Gala papers - they are just so so pretty and make me happy inside - and there's Poofy Flowers which are another love of mine - and I'm in desperate need of some fridge magnets so, I am very happy! hehehehhe
Do you like them??? I do! They have grown on me though - at first I wasn't sure, and I added the leaves to make sure they definitely were flowers and not just weird growths on a peg! hehehehe
I glued the paper onto the peg, then sanded the edges. I added paper to the inside of the back peg as well so from the top you don't see any ugly peg? Then I used a hot glue gun to glue on the magnet and the flower and the leaves, so hopefully these babies should withstand some normal family behaviour! :)
I am thinking these are going to become my go-to gift, sweet, simple yet useful. So don't be surprised if some of you get these for Christmas!!! :) I'm very excited to give these a go in different colours too - and maybe with something other than poofy flowers...
Have a great day!
Smiles
Adele xxx
Showing posts with label Poofy Flowers. Show all posts
Thursday, October 21, 2010
Wednesday, October 20, 2010
Frames Class next Saturday Night
How early am I to have a post up for a class a whole 1.5 weeks before!!!!!! I am very impressed with myself!!! hehehehhe. Desperate mostly after having to cancel our last class for lack of attendees??? I'm allowing myself to believe people are just busy rather than our craft being crap...I really hope that's not the reason anyway...:)
Anyway, onto our next class! We're making frames! I have a love affair with frames as you might have noticed on our this blog (check out here, and here, and here, and here and here and finally here). I find them a really striking yet quite simple gift to make that incorporates something useful (in that it can be home decor) with something that I love, therefore allowing me to give more of myself through my gift.
Blah blah, ANYWAY!!!
Onto next weekend's class... we will be basing our frames on the ones below or on this frame here. You can do the exact options that I have here or play around a little with different colours when you come along...
Really really hope to see you soon! :) :) :)
Anyway, onto our next class! We're making frames! I have a love affair with frames as you might have noticed on our this blog (check out here, and here, and here, and here and here and finally here). I find them a really striking yet quite simple gift to make that incorporates something useful (in that it can be home decor) with something that I love, therefore allowing me to give more of myself through my gift.
Blah blah, ANYWAY!!!
Onto next weekend's class... we will be basing our frames on the ones below or on this frame here. You can do the exact options that I have here or play around a little with different colours when you come along...
DATE: Saturday 30th October
TIME: 7.30pm start
COST: $20 to be paid prior to class in order to secure your seat.
RSVP: by emailing me on adlewiess@yahoo.com.au. Address and bank details will be supplied on reciept of booking.
Thanks for stopping by,
Smiles
Adele xxx
Thursday, August 19, 2010
New Projects
Finally I have a couple of things to show you....
The first are two cards that I made when I visited a very special friend in Melbourne. I was lucky enough to have a weekend away from the family and spend them shopping and eating (lots and lots of good eating) in Melbourne with some friends that have moved there - we had planned to spend much more time crafting then we actually got to, so next time I think we'll just have to stamp stamp stamp the whole time and leave the shops (and our wallets) behind! :)
Anyway, these are the two cards we came up with...
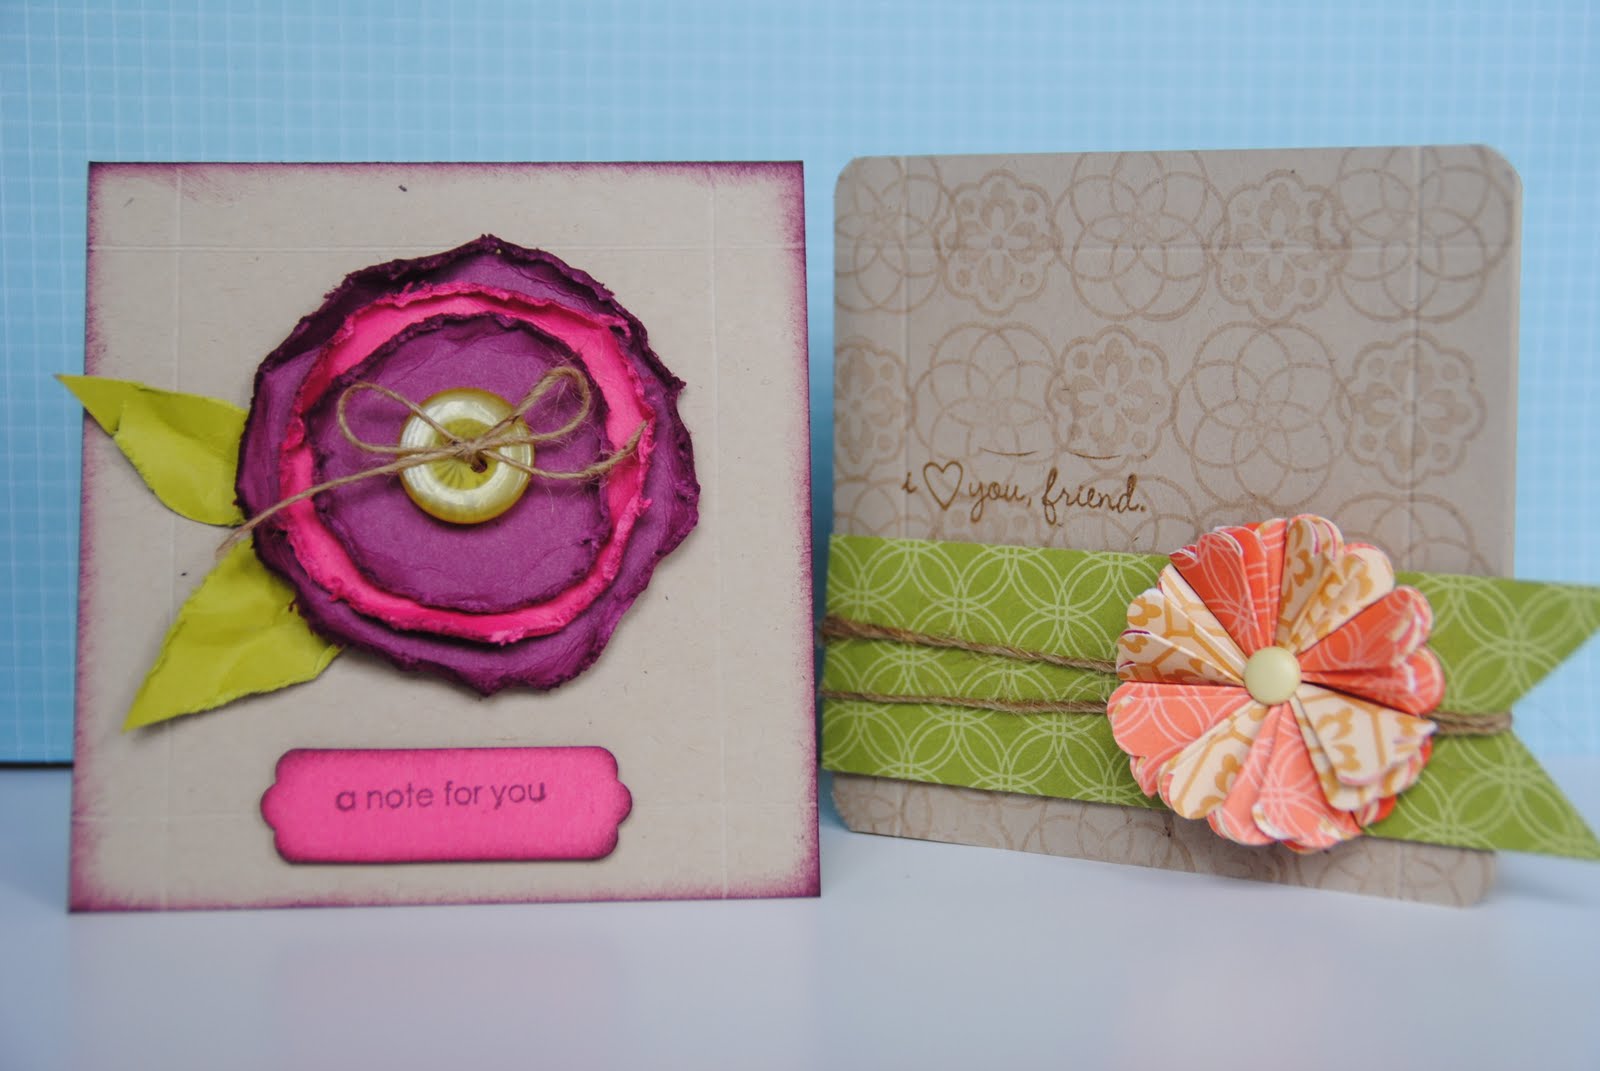
This second card came about from lack of DSP - I hadn't taken any with me due to luggage restraints and so thought we'd make our own. I really really love these colours together (Rose Red and Old Olive) and can't wait to use them more. The flower is made from punching 3 out of CS, totally scrunching it up in your hand and then threading a button through all 3. Love it. This wasn't an actual Stampin' Up! one but I am super super glad it may/is making its debuet in the new catalogue!!! YAY!!!!
Anyways, super simple cards but I still like? Will definitely be back with more soon.
Thanks for stopping by,
Smiles
Adele xxx
The first are two cards that I made when I visited a very special friend in Melbourne. I was lucky enough to have a weekend away from the family and spend them shopping and eating (lots and lots of good eating) in Melbourne with some friends that have moved there - we had planned to spend much more time crafting then we actually got to, so next time I think we'll just have to stamp stamp stamp the whole time and leave the shops (and our wallets) behind! :)
Anyway, these are the two cards we came up with...
This first design is completely inspired by a similar card in the NEW Idea & Catalogue book! (Can I say I am SUPER excited about the new catalogue and can't WAIT to share it with you all come September 1st). I was doing it from memory though so there are a few changes...basically versamarked Vintage Vogue flowers on the background, and then used the bird punch and leaves etc. The flower is the smallest from the Vintage Vogue set cut out and layered then scrunched a little??? The sentiments are from an old set my friend had in her stash...
This second card came about from lack of DSP - I hadn't taken any with me due to luggage restraints and so thought we'd make our own. I really really love these colours together (Rose Red and Old Olive) and can't wait to use them more. The flower is made from punching 3 out of CS, totally scrunching it up in your hand and then threading a button through all 3. Love it. This wasn't an actual Stampin' Up! one but I am super super glad it may/is making its debuet in the new catalogue!!! YAY!!!!
Anyways, super simple cards but I still like? Will definitely be back with more soon.
Thanks for stopping by,
Smiles
Adele xxx
Labels:
Cards,
Poofy Flowers,
Stamping Wheel,
Two-step Bird Punch
Tuesday, August 3, 2010
Chipboard Top Note Booklet
Old title I know but very apt!!!! I have a couple more gifts to show you today - these were both for super special people who mean a lot to me - needless to say I had a BLAST making them!!!
Unfortunatley, for this first project I haven't used Stampin' Up! product much - I did use the bigshot, some ribbon, the Scallop Circle Punch and the Stampin' Up! Glue Stick, but other then that the paper is from K&Company and the embellishments from the local scrapbooking and craft store...
Smiles
Adele xxx
Unfortunatley, for this first project I haven't used Stampin' Up! product much - I did use the bigshot, some ribbon, the Scallop Circle Punch and the Stampin' Up! Glue Stick, but other then that the paper is from K&Company and the embellishments from the local scrapbooking and craft store...
And this is the matching card...I did use Kraft as my base....
The 'Friend' panel is from the Vintage Vogue stamp set, and the small flowers are actually the Blossoms Three punch layered up with a stick-on jewel in the centre - they are very cute.
These top note die books are very easy to make - I've just purchased some chipboard sheets from the local scrapbook store and cut them out on the bigshot with the die and presto, you have your very own littl book to cover and decorate as you will! Love it!
Smiles
Adele xxx
Labels:
3D Projects,
Big Shot,
Poofy Flowers,
Top Note Die,
Vintage Vogue
Wednesday, June 30, 2010
More Paper Flowers
I had to make a quick gift for my husbands Gran this afternoon and decided what could be better, more elegant or quick than a frame!!! So out came the good old 'poofy flowers' - one of my favourites!!!! I love these flowers - so simple to do and they look just awesome (well, I think they do!).
Sorry about the bad photo's - I had to take them really quickly before rushing out the door!!!
If you're interested in having one of these frames for yourself I will be selling this size (8x10inch) for $45 each. I have 3 frames ready to ship to new homes!!! Also, I will be running a class for the smaller sized frame from this post at a later date so keep your eyes glued to this space!!!! :)
If you'd rather learn how to make these flowers for yourself and do up your own frame I am running a Paper Flower Tutorial Class this Friday night so email me RIGHT NOW and book yourself in!!! :) You can see all of the flowers we'll be making in my previous post.
Thanks for stopping by - I love you all!!!! :)
Come again soon!
Smiles
Adele xxx
Tuesday, June 29, 2010
Paper Flower Tutorial Class
Hello and good morning!!!!!! Just a quick post to show you some of the cards (and FLOWERS) we will be making in this Friday's Paper Tutorial Class...
Sorry about the bad photography, but you get the picture right?? :) 7.30pm start, $15 to make all 6 of these cards and any extra flowers we get time to make...
Really hope you can make it. You can email me to reserve your place now...I can accept reservations any time until Thursday night...moneys are to be paid before Friday night where possible...
Thanks so much for all your lovely comments and support - I LIVE for my comment box!!!! hehehhe
Hoping you have the BEST day ever, and hope to see you on Friday night!
Smiles
Adele xxx
Labels:
3D Projects,
Big Shot,
Perfect Punches,
Poofy Flowers,
Technique Class
Tuesday, June 8, 2010
Framed flowers
Lisa xx
Labels:
3D Projects,
Big Shot,
Frames,
Poofy Flowers,
Top Note Die
Sunday, May 23, 2010
More Circle Circus
Another card using Circle Circus - on the background stamped in versamark. I AM happy with the effect but these two particular stamp images don't fit quite perfectly together - but hey, that's ok isn't it??? :)
I tried a new type of flower - a tutorial for it can be found here on Betsy Veldman's blog (doesn't that name just sound like craft/homemaking/sewing/sugar and spice and all things nice!!! Well, her blog is AMAZING!!! Check it out!) I love it and can't wait to try it in material and other mediums like Betsy's done. My favourite thing on this card is the fact that I've actually threaded the button on to the cardstock rather than just tying the bow on the button and then using glue dots or Pritt to stick the button to the cardstock. This time I actually punched two small holes in the centre of my base cardstock and threaded the twine up through those and then through the button, so when I tied the knot it actually pulled the button closer to the flower?? Does that make sense?? I got this button threading idea from Betsy as well. It just makes the button sit so much more flush with where its being placed rather then bobbing up a little bit and being skew-iff (if you look at the button's on my Chipboard Gift Bag you might notice these button's aren't sitting quite right - that's because the twine underneath the button stops the button from sitting flat. Get it?)
Anyway!!!!
So I have some blog candy for you (something new for me too!!!) The first person who can email me (you'll find my email address on the side bar to the right) and tell me how many times I've used the word BUTTON in this entire post will get a pack of Stampin' Up! buttons (either the Button Bouquet or Button Latte set which can be found on page 151 of the catalogue!) So good luck to you all!!!! hehehehe
(Would it be ok if only non-demonstrator's participated in this little challenge - that way we can spread the Stampin' Up! love around...:o)
Thanks so much for stopping by and PLEASE come again soon!!!
Smiles
Adele xxx
Wednesday, April 28, 2010
Baby Lilli
So I have felt rather absent from blogging the last couple of days as I've been visiting my older sister in NSW and haven't been able to do my usual blog stalking!!! hehehehe I just got back today and have been trying to catch up on all my favourites and thought I'd jump on here and put up a quick post - a little present for my beautiful niece - Lilli Emma - who is my sister's 5th baby girl!!!! How awesome is that - my lovely husband let me go and visit for a whole 5.5 days while he and a darling friend struggled with my own 3 kids on their own!!! Isn't he a gem...
So before I left I made this little frame up for my sister's nursery - she loves poofy flowers and I thought there could be nothing simpler than putting them in a frame and since I was already in the frame mode I just stuck it all together...
I really like the soft colours of this one though again its probably a little same-ey and could have done with some definition??? But my sister loves it so that's the main thing right??? :)
I also had to make a card and I had this strip of left over ribbon that was begging to be used - not really happy with this card (too top heavy) but I was making it very (!!!!) late so I couldn't afford to be too picky! hehehehe
Ok enough waffling - will be back soon with some more (hopefully) projects!
Hope you're having a fantastic week
Come back soon!!!
Smiles
Adele xxx
So before I left I made this little frame up for my sister's nursery - she loves poofy flowers and I thought there could be nothing simpler than putting them in a frame and since I was already in the frame mode I just stuck it all together...
I really like the soft colours of this one though again its probably a little same-ey and could have done with some definition??? But my sister loves it so that's the main thing right??? :)
I also had to make a card and I had this strip of left over ribbon that was begging to be used - not really happy with this card (too top heavy) but I was making it very (!!!!) late so I couldn't afford to be too picky! hehehehe
Ok enough waffling - will be back soon with some more (hopefully) projects!
Hope you're having a fantastic week
Come back soon!!!
Smiles
Adele xxx
Labels:
3D Projects,
Big Shot,
Cards,
Fox and Friends,
Frames,
Poofy Flowers,
Ruffled Ribbon
Friday, April 23, 2010
Its Friday FINALLY and that means its time to stop stressing about this FRAME and just give it away with all the love, time and effort that went into it!!! hehehehe
Thank you soooooo much to all of you out there who took the time to have a think and make such awesome suggestions - I really really REALLY appreciate your kindness and effort and feel TERRIBLE that I haven't been able to incorporate ALL your ideas - they were all brilliant and I thank you so much and apologise and hope you wont be offended if you dont see your suggestion used here this time - but there IS always a next time and I just was just wowed by the support and help you all offered!!! Thanks so much guys.....xxxx
I did kind of forget to mention in the first place too that I had HOT GLUE GUNNED everything down so it wouldn't fall whilst hanging so that really limited in moving things around.....SORRY!!!!
So, in the end I was able to incorporate a suggestion by Sandy M (thank you!!!!) - she suggested glueing some blue ribbon around the edges of the frame and hanging it with a ribbon bow, so I've cut up strips of the background paper, sponged them in white and then sanded away till I was happy with the result! I know it is flawed, the frame was bigger then a 12x12 piece of paper, but I'm still really really happy with the result! I actually really like it now - it was just the thing (for me) to change it up!!


I am so scared all of you that have invested thought into this frame will still think it falls short but I am happy with it now, and really hope little Matilda will be too!!!
Thanks again, and again and again!!!
Hope you're all enjoying the AWESOME posts by Lisa - isn't she amazing!!!! Make sure to check back and see some more of her amazing stuff again soon!!
Thanks for coming,
Smiles
Adele xxx
Thank you soooooo much to all of you out there who took the time to have a think and make such awesome suggestions - I really really REALLY appreciate your kindness and effort and feel TERRIBLE that I haven't been able to incorporate ALL your ideas - they were all brilliant and I thank you so much and apologise and hope you wont be offended if you dont see your suggestion used here this time - but there IS always a next time and I just was just wowed by the support and help you all offered!!! Thanks so much guys.....xxxx
I did kind of forget to mention in the first place too that I had HOT GLUE GUNNED everything down so it wouldn't fall whilst hanging so that really limited in moving things around.....SORRY!!!!
So, in the end I was able to incorporate a suggestion by Sandy M (thank you!!!!) - she suggested glueing some blue ribbon around the edges of the frame and hanging it with a ribbon bow, so I've cut up strips of the background paper, sponged them in white and then sanded away till I was happy with the result! I know it is flawed, the frame was bigger then a 12x12 piece of paper, but I'm still really really happy with the result! I actually really like it now - it was just the thing (for me) to change it up!!
I am so scared all of you that have invested thought into this frame will still think it falls short but I am happy with it now, and really hope little Matilda will be too!!!
Thanks again, and again and again!!!
Hope you're all enjoying the AWESOME posts by Lisa - isn't she amazing!!!! Make sure to check back and see some more of her amazing stuff again soon!!
Thanks for coming,
Smiles
Adele xxx
Labels:
3D Projects,
Frames,
Poofy Flowers,
Ruffled Ribbon,
Vintage Vogue
Wednesday, April 21, 2010
HELP NEEDED!!!
So I'm in need of some real, gut wrenching, brutal honesty here....I have a very close friend and her daughter is turning 4 this Friday and she's mentioned once before that she'd love to get her daughter's name put into a frame for her bedroom wall - well, I couldn't fit her daughter's name into the frame so I found this gorgeous 'dream' word and thought of trying that instead....I really like the word but here is my delimma....
I'm not at all sure I like this completed frame???? I'm not sure if its all a little bland, or not enough happening around the edges or what???? So I'm hoping you can all give me some very very honest opinions of how ugly/ok this is and if perhaps some advice on how to fix it!?!?!
I really wanted this gift to be special and somehow feel its fallen short...can you help me out at all!?!?!?!??! I'm almost feeling like this should go in the bin and I should go and 'buy' a present but am too scrooge like to let it go to waste if you can help me save it???
Hope you're all enjoying your day, I've been stuck in traffic in rainy weather for over 2 hours today so I'm feeling totally frazzled and this frame issue is just not helping!!! heheheh
Thanks so much for your help!!!!
Smiles
Adele xxx
Labels:
3D Projects,
Frames,
Poofy Flowers,
Ruffled Ribbon,
Vintage Vogue
Friday, April 2, 2010
Liam's Birdhouse
I just quickly had to jump on and post this GORGEOUS little birdhouse I made to go with the card's I made last night (with the poofy flowers)...
I emailed Liam (http://www.inspirestampin.blogspot.com/) and asked her for a template to make her little birdhouse - I don't think I did mine actually totally to plan and I would do different things next time (I cut out a few panels which probably didn't work so great) but I think the effect is still very very cute!!!
Head on over to Liam's blog and check out all her AMAZING 3D products...
Thanks for looking!!!! Come back again soon...xxx
Smiles
Adele xxx
Subscribe to:
Posts (Atom)