Saturday, July 9, 2011

Another Class Card

This is the fourth card we made at our Stamp-a-Stack class last week...


I don't think this is in my normal style, but I actually really like the busy-ness of it. We created the background by using the Musical Notes Standard Wheel and then stamping that lovely large bold Baroque image over the top. Add some DSP, a lovely paper flower, and a sponged chipboard letter and you're pretty much done.

And I have to say I'm loving that gorgeous rich Concord Crush too! Yum Yum

Smiles

Adele xxx

Thursday, July 7, 2011

Impressions Magazine Case


This is one of the cards we made at my last Stamp-a-Stack class - totally CASEd from a recent Impressions Magazine edition. I loved the look of the card when I saw it in print but didn't think more of it till I watched the tutorial on Stampin' Connection (a forum available to Demonstrators - seriously an AWESOME place to recieve inspiration - you are definitely not left to your own devices when you join the Stampin' Up! family - you should give it a try :) :) :) It looked super achievable and is truly stunning - I can't wait to try this same principle in different colours and stamps...


So what is it? Its a fabulous use of our Shimmer Paints and they are BEEEA-U-TI-FUL! You stamp the main image in the colour of your choice, clean your stamp, and then sponge on the Shimmer Paint of your choice, stamping it over your original image. Here I have used Champagne Mist and I LOVE the soft shimmery-ness of it.  Of course the photo's don't do it justice...:)


I LOVE that Crochet Trim as well - hopefully it will make a come back and we can have it all the time!

Thanks for stopping by - I have a couple more posts coming up so be sure to come back again in a few days and I'll have some more eye candy for you!

Smiles

Adele xxx

Tuesday, July 5, 2011

A Work In Progress

I've started a present for a special someone and am a little lost as to how to complete it, and thought you'd all have some fabulous ideas for me! :)

Its a 9cm x 9cm wooden block and I've covered all four sides with a photo of the kids and my husband and I. I love the effect of the four sides, but have put DSP paper on the top and had thought to put a flower on the top - but it looks a little bit like a muffin and I'm not sure I like the introduction of the colour against the black and white photos. I love the rawness of the wood and black and white images...

What do you think...


I'd like to get some rub-on's to put over the photo's but am stumped as to what to do to the top, if anything?

Can't wait to hear your ideas - I'm sure they'll be the perfect solution...

Thanks for your help!

Smiles

Adele xxx

Wood Blocks Class

Hello lovelies - just popping on to show you a variation of the photo wood block we'll be doing in a class this Saturday evening. Here is the original block...and here is the variation...


I've tried to keep this one relatively embellishment free as I'm still deciding whether its masculine enough to give to my husband for his upcoming birthday??? I've also added the word which I kind of like - it makes it have more of a scrapbooking feel...

If you're interested in making one of these for yourself the class details are

THIS SATURDAY 9th July

7.30pm @ my house

$15 - you will need to supply your own picture obviously :).

RSVP: This Thursday 7th July

I made one of these for my mother's birthday on the weekend and used a colour photo and it worked just as well - I loved the colours and brightness of it. If I can I'll try and get a photo of it before the week is out, so you don't have to use a black and white if you don't want.


Have a great week and hope to see some of you soon! :)

Smiles

Adele xxx

Friday, July 1, 2011

Baby Shower


I know I haven't contributed anything for months...but I'm slowly getting back into everything after being away overseas with my husband and daughter on our trip of a lifetime! We had such a blast but are well and truly back to reality and normal life.
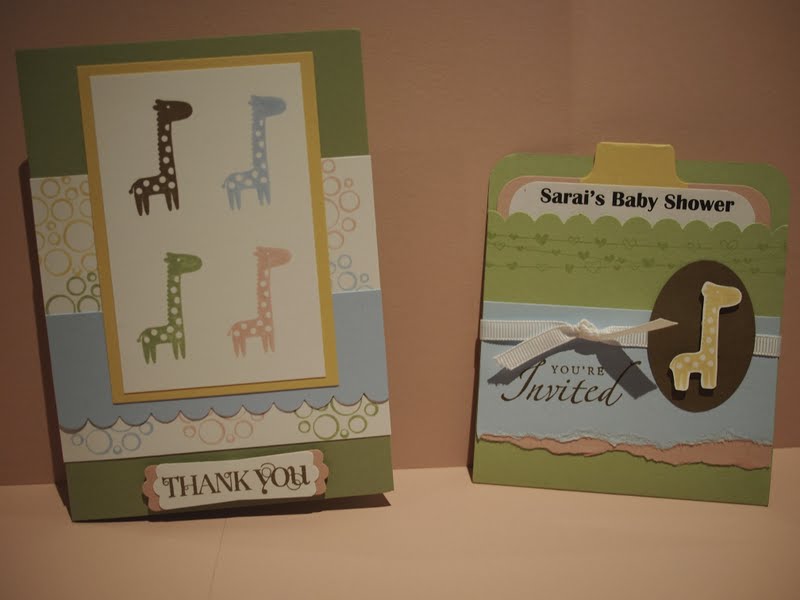
My sister-in-law is having a baby any day now and a few weeks ago I hosted her baby shower. I actually made the invites before we left on holiday and then had the party 1 week after we got back. She loves giraffes and doesn't know if she is having a boy or a girl so I decided to make everything multi-coloured!
I carried the animal theme through the invites, the decorations and the thank you cards. I even made some paper bunting which was very easy and quick. From her party I have been asked to make invitations, cake toppers and more for a little boys 1st birthday party so when I complete those I will post some pictures.
I have fallen back in love with the Fox and Friends stamp set! I also love the word set Curl Cute, which is where the 'Thank you' on the thank you card is from.

Hoping to post more soon,
Lisa xxx

Saturday, June 11, 2011

Candles!

So I have JUST finished this little project of mine in time for Church tomorrow, and its night time and my night time photo's suck, but I just HAD to jump on here and share a photo or two with you...


So why am I so excited you ask??? Its just a stamped candle? We've all seen these before right? Well - you probably can't read the words on these candles because the photo's are (pretty) bad, but they don't come from a stamp. They are a scripture that goes with the lesson I am teaching tomorrow and I just had to figure out a way of getting it on to that candle.

So how did I do it you say? You may be clever enough to have already thought of my method, but for me it was a lightbulb moment.

I typed up my words on the computer, and then got an OHT sheet and printed it on that. As soon as it came out of the printer I whipped it on to a waiting piece of tissue paper and used my bone folder to moosh the ink onto the tissue paper. It comes out backwards (do you get me - looking at it from the printer the words are the right way round, but when you place it on the tissue paper you want the inked side to go down, so when the words are 'stamped' they're backwards). Then I proceeded with the normal method of decorating a candle. You can find an awesome tutorial here from Splitcoast Stampers.


Fun hey. I'm really really happy with how they've turned out and think they make really cute hand outs. Best part yet - they were on sale at Target so I got them for next to nothing. Got to love a bargain.

Now that I've done it I will DEF be doing these again. Wouldn't they make gorgeous gifts? And now I know I'm not limited to the stamp sets I own - I can type out anything I'd like!!!!! YAY!!!!!

Thanks so much for stopping by,

Smiles

Adele xxx

Thursday, June 9, 2011

Name Blocks

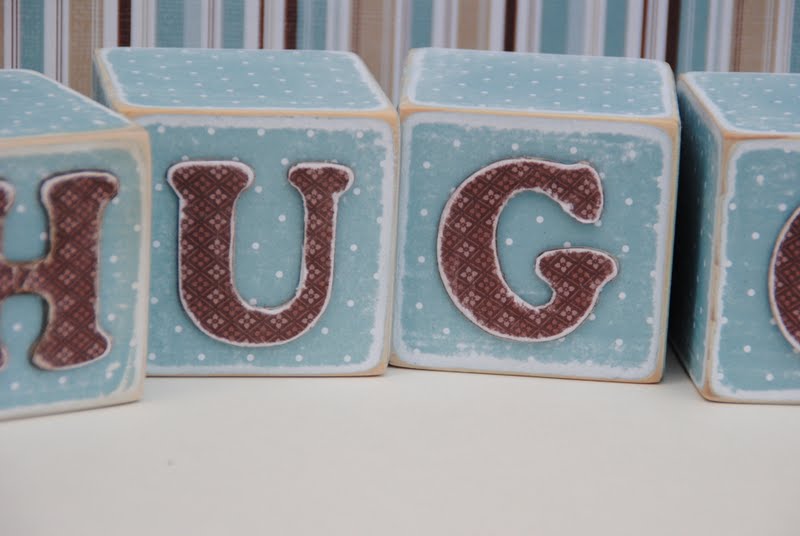
Another set of name blocks - these ones for an ADORABLE little boy named Hugo! I've taken far too long to make these ones - little Hugo is almost 3 weeks old - doesn't time fly! Anyway - these are 7cm x 7cm, covered in Baja Breeze DSP from the last catalogue and I've also covered the Chipboard letters this time which is a first - normally I just paint them white or vanilla, but I felt this time I needed to do something more, and I really like the effect. Hugo has the most gorgeous (!!!!) retro knit blanket and it kind of inspired me with the blue and brown together.


If you have any questions just shoot me an email and I'll answer asap.

Thanks so much for stopping by - come again soon!

Smiles

Adele xxx


Wednesday, June 8, 2011

Picture Blocks

So this is my newest wood-working craze - photo blocks!!!! I saw the idea for these on a site I used to prepare my lessons for a class of young girls I teach at church and adapted it a little to suit my need for pretty flowers and accessories! :) We ended up doing this as an activity and all the girls got to make their own.


So I'm planning on adapting these to use a photo of Ystyn and I, or the kids or whatever photo I might like and do the same thing. I'll be back soon with new photo's later in the week...but I have to say, I love the things you can do to a boring lump of wood!

Smile smile smile,

Adele xxx


Cards for June Class

Just popping back to show you 2 of the cards we'll be making at my card class coming up on Tuesday 28th June...


This is the Faux Silk card we'll be doing - I've changed the colours from the brown version I did here - I really like these soft colours - I've used Naturals Ivory as the base and the retired Pale Plum (???) and Crumb Cake.


Next up is a card I've CASEd from the front cover of the catalogue - I've been wanting to make this card for forever and I have to say I LOVE it - of course these papers are my absolute favourite (Greenhouse Gala) and the Top Note of course looks fabulous any which way its used...


 So there you have it. I'll hopefully post the last two cards we'll be making later in the week.

If you'd like to come along and make these cards for yourself email me to reserve you place.

Tuesday 28th June
7.30pm start
$20 to make 8 cards (2 each of 4 designs)

RSVP - as soon as possible! :) :) :)

Thanks for stopping by,

Smiles

Adele xxx

So its my Dad's 60th birthday in a couple of weeks and my older sister and her family (5 daughters and husband) are all driving up from NSW for the celebrations. We have some fun things planned between the 3 of us (my older & younger sister) and one of these is a party! Of course - who can celebrate turning 60 without a party!!!!

We're really excited about what we've chosen to do - we're basing it all on a fav story of ours from our dad's childhood - Dad used to love playing cowboys and indians and one day they decided to actually tie someone to the stake!!!! So - they got a victim all tied up and proceeded to light a fire to burn the baddie - to cut a long story short, the baddie got away but the garage didn't survive?? Dad burnt down grandad's shed!!!!!

We loved Dad telling us this story - its always been a family favourite. And since I actually currently live in my grandparents house where said shed used to exist we'll be holding the party here in the existing shed/garage! And we're having a Western theme - complete with a cardboard cowboy city and a teepee and stake all set up. We're going to have lots of fun games for the gazillions of grandkids that will be running around and some yummy yummy food.

Anyway - so invitations needed to go out to the friends we're inviting - and this is what I came up with. I was looking for the old 'Wanted' stamp set or anything 'Western' I could get my hands on, but in the end decided to just use what I had on hand - the Medallion stamp, the Sanded background stamp and the lovely Vintage Wallpaper embossing folder. I think it kind of all worked together fairly well - looks a bit like a pirate map to me, but hopefully its suggestive enough of old world roughness....


I've stuck a magnet on the back so they can be popped onto the fridge if wanted, and of course decorated the envelopes which you can just see in the background.

Love love love how versatile our stamps and inks and embossing folders are....just awesome!

Thanks for bearing with me through such a long post...

Smiles

Adele xxx

Paper: Naturals Ivory, Chocolate Chip, Baja Breeze, Peach Parfait
Stamps: Medallion, Sanded,
Other: Vintage Wallpaper Embossing Folder, Twine, Sponging,

Thursday, June 2, 2011

Class Dates for June/July

Well, I think its high time I set some dates for a class or two - its been FOREVER and I miss seeing all of my crafting buddies!!! :)

So, with school holiday's upon us I thought it would be a perfect opportunity to set some dates...

Tuesday 28th June

Stamp-a-Stack

$20 to make 8 cards (4 designs, 2 of each)
We will be doing a few new techniques at this class - Faux Silk and Faux Mother of Pearl - see photo at end of post...

7.30pm start

My house - address given on reciept of RSVP.


And

FRIDAY 8th July

Wood Blocks Class

$15 to create your very own vintage wood photo block. We made these for a craft class at church recently and they turned out beautifully so I'm really excited to do this as a class. I forgot to take a photo before giving my example block away, but I'll make another one before the end of the week and post it on here so you can see.

Here is a shot of a Faux Silk card - not sure if we'll do these colours of something a little different, again - I'll decide before the end of the week and post photo's on here so you can see.


Really really hope LOTS of you are available to come - I miss you!!!! :) :) :) hehehhe

Have a fantabulous week and I'll be back SOON with more photo's!

XXX XXX XXX

Adele

Another Baby Card...

I have a couple of really bad photo's to share with you today - I really need to improve where I take photo's - I need something much quicker and easier then I have been doing in the past - it just takes way to much energy to 'set up' a little studio every time I want to take a photo?????

Anyway, here's a few of a baby card I made for a lovely lovely friend who just had the cutest little baby boy a week or so ago (seriously - ADORABLE!!!!)...


I love Crumb Cake for baby's cards - it goes so well with the nice soft blues and pinks. I've used the Nursery Necessities set for this one (an old retired set) and Fox and Friends from the current catalogue. Not extremely original but I thought it turned out really cute.


And one more close up...


I have made some matching name blocks to go to this little fellow - I'll take some pictures later on today and post them up so you can have a gander - I do so LOVE blocks!!! :)


Thanks so much for stopping by,

Come again soon,

Smiles

Adele xxx

Wednesday, May 18, 2011

Just Believe Faux Silk

I have another card to share with you today - I have actually been crafting madly prior to Mother's Day - my gifts to my mother and mother-in-law was a box full of cards and envelopes so it was a mad rush to get the box full enough. Photo's you say???? Well, I forgot, or ran out of time, or both! So sad because there were some cute ones in there - all mostly simple - I'll probably try and recreate some of them and share them with you then.

Anyway, this is a card I made for a friend who is moving using the Faux Silk. This is a technique I've been dying to try but I kept forgetting to buy white tissue paper! This was SOOOOO easy, and is definitely a FAVOURITE technique that I will use again and again and again - all you have to do is stamp your image on a light coloured base, then take a piece of light coloured tissue paper (I've only used white) and cut it slightly larger then the stamped piece of cardstock. Then you scrunch the tissue paper up in your hand into a tiny ball - unravel and use our Anywhere Glue stick to cover your cardstock with and spread out your tissue paper over the top. Trim the edges and its done! And how stunning does it look...


And yes, there's that damn ruffled ribbon again??? hehehehe. I am ALWAYS finding a reason to use it - hehehehe - I really need to come up with some new tricks! :)


Thanks so much for stopping by, hopefully I'll have more to show soon!

Smiles, hugs and more smiles,

Adele xxx

Baby Gifts

Hiya there! Its been a little longer than I was hoping it would be :) - I don't know about you but I am DYING to hear all about the Stampin' Up! Convention and am stalking blogs of the lovelies I know of who attended! I'm hoping they all had a fabulous time and have time to share all their fun with us (hint hint hint!!! hehehehe).

Anyway, I had to make a gift for a friend who's just had a lovely, gorgeous baby girl! I made a set of blocks (like these) - pink ones with the little one's name on it. Of course I had to make a matching card.....


And of course matching wrapping and a tag! I actually didn't write on the tag this time so it can be re-used if wanted???


I think that elephant is just the cutest thing ever! And of course pink and craft together aren't too bad either? :)

Thanks so much for stopping by,

Come again soon,

Smiles

Adele xxx

Monday, April 25, 2011

Easter

Hello lovlies - I am really hoping you've had a wonderful wonderful Easter weekend. We've had a fantastic couple of days spending time with our family, just taking it easy. Its also been a very spiritual weekend for us as we've tried to teach our children and remind ourselves of the true meaning of Easter. I'm so greatful for these seasons of reflection...its been truly wonderful...

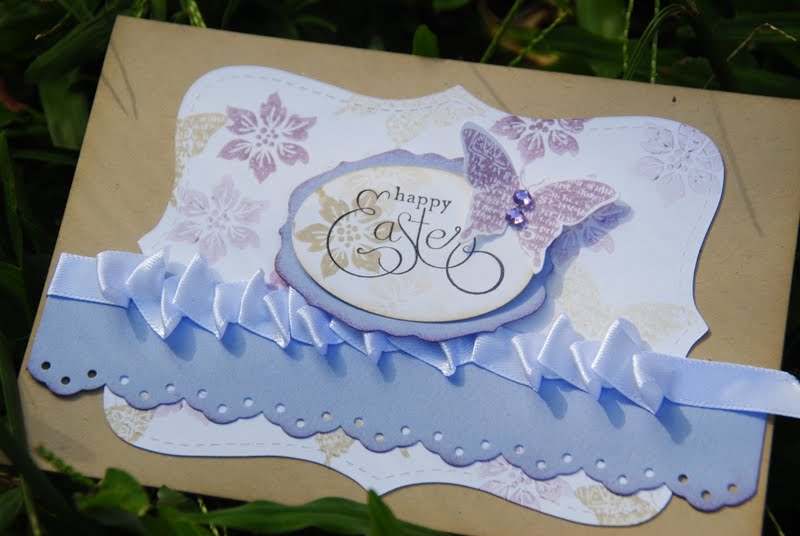
So anyway, on to the craft - I was able to spend a little time making some small Easter gifts for a few friends. I was on the lookout for a really simple basket or box and saw this one on Marelle's website and decided to give it a go. Marelle has used her Big Shot Scallop Square Die Cut which I don't own, so I just cut a square to the size I wanted and used my border punch to create some detail. Seriously simple and really effective.


I didn't have time to set up my normal 'studio' to take my photo's, but the grass served fairly well - :) :) :)

And of course I had to make some matching cards - very simple and very quick, but I think they still look pretty.


Thanks for stopping by, come again soon!

Smiles,

Adele xxx

Thursday, April 21, 2011

Bliss!!!!!


I fell in love with this set as soon as I layed eyes on it. I love the beautiful gorgeous flourish and the vintage-y feel of it all. This card was super simple to make - ummmmm - perhaps that's because I CASED it and had very little to think about! :) I have just discovered the beautiful Renee's blog after she left me a blog award (thank you so much Renee!) and these stunning cards she has made with this set. Her blog was also the place where I got the idea for the tulips on my last card... 


I've made a few subtle additions - the Lace Border punch, the glitter around the edges of the main panel and the flourish image stamped in the background, but in essence it is totally Renee's gorgeous work, and I LOVE it! I think I'm going to make a few of these - perfect for weddings/engagements/birthdays - whatever the occasion - I love it...


There are a number of other amazing cards I've scoped out while I've been sick so I will most likely be CASEing those in the coming weeks as well while I get back into the swing of things - I'm so grateful for all the amazing inspiration out there...

Did I tell you how HAPPY card making makes me??? :)

I hope you're doing something that makes your heart sing too...

Thanks so much for stopping by,

Smiles

Adele xxx

Wednesday, April 20, 2011

CARDS!!!!!!

YAY!!!!! I have FINALLY been able to get around to making some CARDS!!!!

And it was so exciting!

I thought it would be really hard getting back into it and that I would be dismally unhappy with the outcome, but in actuality, I'm pretty happy with the outcomes - yes, outcomeS - I made 2 cards!!!! But I'm only going to post one tonight and keep the other one for another post...

I haven't had a chance to play with the Sale-a-bration sets, so I'm sorry but I'll probably be playing with them for a little while?

Anyway - here it is...


i LOVE the colours in this card - Marina Mist, Poppy Parade, Pumpkin Pie and Old Olive - so nice and bright and happy!

I think its missing a little something, but for a first attempt in months I can let it go quite happily ;)


There's the tiniest little bit of glitter on the cut out flower - not sure if I should have cut out ALL of the flowers or not - next time perhaps...

And here's a little look at the inside - I left it nice and simple...


So there we go - hopefully I'm back at the crafting table for good for now - I can tell you it felt AMAZING being able to make cards again - it does something to my brain - I always feel so much happier afterwards.

Thanks for stopping by, hope you all have a wonderful easter with your loved ones.

Come again soon - hopefully blogging will become a regular event!

SMILES!!!!!!!!!

Adele xxx