Showing posts with label Perfect Punches. Show all posts

Wednesday, June 8, 2011

Cards for June Class

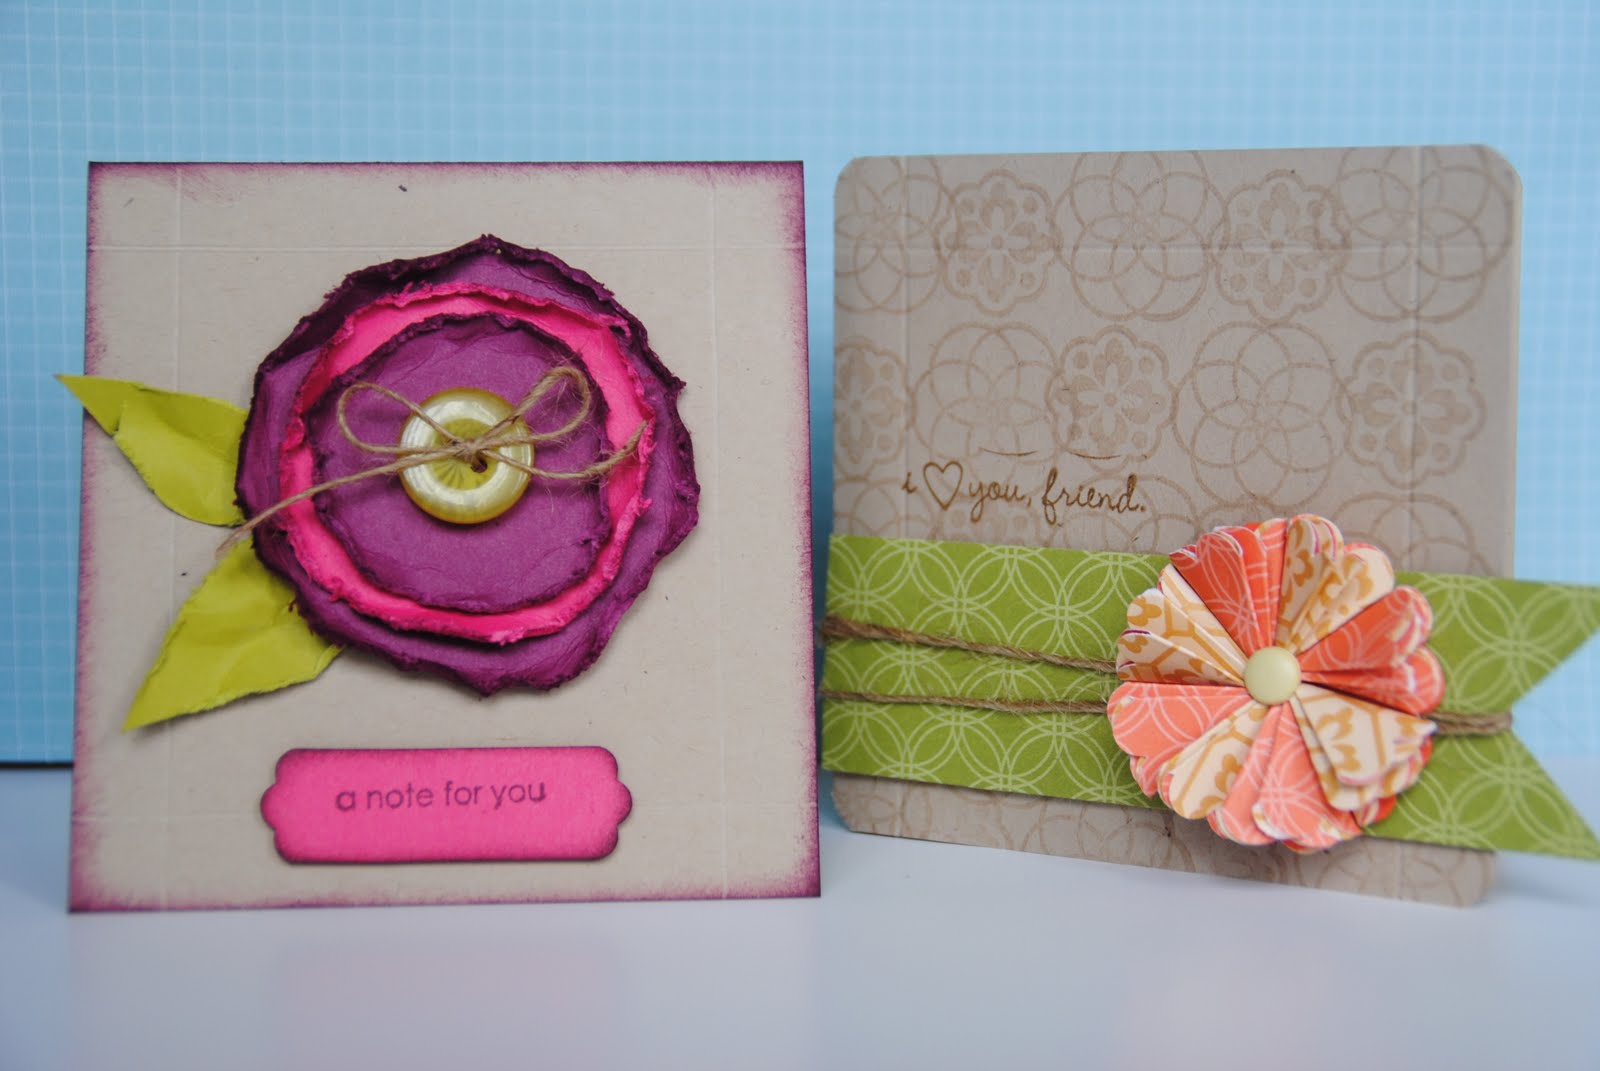
Just popping back to show you 2 of the cards we'll be making at my card class coming up on Tuesday 28th June...


This is the Faux Silk card we'll be doing - I've changed the colours from the brown version I did here - I really like these soft colours - I've used Naturals Ivory as the base and the retired Pale Plum (???) and Crumb Cake.


Next up is a card I've CASEd from the front cover of the catalogue - I've been wanting to make this card for forever and I have to say I LOVE it - of course these papers are my absolute favourite (Greenhouse Gala) and the Top Note of course looks fabulous any which way its used...


 So there you have it. I'll hopefully post the last two cards we'll be making later in the week.

If you'd like to come along and make these cards for yourself email me to reserve you place.

Tuesday 28th June
7.30pm start
$20 to make 8 cards (2 each of 4 designs)

RSVP - as soon as possible! :) :) :)

Thanks for stopping by,

Smiles

Adele xxx


Tuesday, November 23, 2010

Presents!

I needed to make a present for a very special someone during the week and this is what I came up with...

A Box of Roses...

This is the box - a paper mache box I purhcased and decorated the front of - I was inspired by the gorgeous little box on one of the first pages of the current catalogue - I love how this turned out...


And then once you open the lid this is what you see - a first layer of tiny little flowers all pre-made, ready to go...


Then a second layer which has stacks of hand cut leaves to go with what was in the bottom of the box...


Which was stacks of these roses! My favourite flowers of the moment - the same ones that I made to use on this card here. I didn't attach the leaves myself because as you can see from my original card sometimes a flower doesn't need leaves to look gorgeous! :). So I just had them all ready to go should a particular flower be in need of some greenage...


A close up of the first 'drawer' - just a shallow box with a ribbon handle so it can be pulled in and out of the box. I'm not very clever when it comes to designing things and this was the best I could come up by way of getting layers into my box - hopefully its not too annoying to access the other contents?


A close up of some of the flowers - these are all made using the Circles #2 Die cut from the Big Shot - just run out a whole heap of coloured circles, spritz them with water and scrunch, leave to dry a little, then assemble. Simple but effective - I think anyway? :)


The card I made to go with it all. Its so easy to make things when you've got a theme going. Not sure if its over-kill or not, but I made the card to match the tag to match the box? All the same but different?? Is that what you do when doing packaging and gifts?


And a close up of the tag. I loved this tag - so cute and so easy to make - and re-usable! I only wrote in the card so this tag can be used again and again. Cant wait to get started on some Christmas tags!!!


So there you have it - a Box of Roses for a Special Someone! Lots of love went into this box - I hope that shows through...

Thanks for stopping by,

Don't forget our last class of the year is this Saturday night - see here for further details!

Smiles

Adele xxx

Stamps: Word Play, Vintage Vogue
CS: Crumb Cake, Assorted Current Colours( for small flowers), Cherry Cobbler, Very Vanilla, Crumb Cake, Old Olive, Pear Pizzaz,
Ink: Crumb Cake, Soft Suede
Other: Big Shot, Circles #2 Die, Three Blossom Punch, Two Way Bird Punch, Dimensionals, Vintage Brads, Circle Ice Brads, Assorted rhinestone gems from personal stash, Riding Hood Red Striped Grosgrain Ribbon, Scallop Trim Punch 

Wednesday, November 10, 2010

Inkspirations Sketch Challenge #47 and BLOG CANDY

So as you can see I had a REALLY fun night last night - I made 2 cards which did mean I stayed up later than I should have but I enjoyed myself none the less!!! hehehe

This is the sketch for the Inkspiration Challenge...


And this is my card...


As you can see (I hope you can!!!!) I've flipped the sketch to suit my card, but I did try very hard to keep most of the components of the sketch present.

Once again I've used the lovely Dasher - he is just adorable I think, and I love to see his antlers all glittery! I've also embossed on vellum for the very first time and really like the effect. You might not be able to pick it up in the photo's but I have used the snowflake images from Snow Swirled to stamp on the background card behind the images - they're just not showing up to well?

All in all a very wintery Christmas card - so not an Australian christmas but gives the illusion of a white one!

Now - can you see that gorgeous little snowflake that creates my focal point just below Dasher??? If anyone can tell me where I've got it from I will send them a little BLOG CANDY!!!! Just leave a comment on this post - I will write the names of all correct answers and do a little draw next Wednesday! Happy guessing!!! :) :) :)

Thanks so much - you guys are AWESOME!!!

Lots and lots of smiles

Adele xxx

Stamps: Dasher, Snow Swirled, Best Yet
Cardstock: Bashful Blue, Whisper White, Crumb Cake
Ink: Crumb Cake, Whisper White Craft
Other: Scallop Trim Edge, Vellum, Whisper White Taffeta Ribbon, White Embossing Powder, Big Shot, Polka Dots Embossing Folder, Dazzling Diamonds, Two Way Glue Pen

Just Add Ink Sketch Challenge 42

Edited: Yay! This card was chosen as a Top Pick for this challenge! I am thrilled and excited and very very grateful to the 'pickers' (thank you so much!!!) but most especially to all the lovely people who have left such supportive comments! Thanks guys...can't wait to play again! xxx


Well hello there friends! Just popping in today to share with you a little card I made using the Just Add Ink Sketch Challenge for this week - super cool sketch - so great to play with...

And here is what I came up with...


Way too many photo's I know - I just can never choose which one to post!!! hehehehe

Recognise that flower? I stole the idea from the Idea & Catalogue Book  - check out page 153. :) All I did was run out a set of circles on the Big Shot with the Circles #2 Die, then I used a little misting bottle to wet the paper and scrunched, set aside till they dried and then opened them up. I really like how they've turned out - nice and soft and relaxed. Will definitely be making more of these that's for sure...

Stamps: Baroque BG, Echoes of Kindness, Word Play
Ink: Concord Crush, Stazon Black, Perfect Plum
Paper: Concord Crush, Perfect Plum, Very Vanilla
Other: Big Shot, Circles #2 Die, Scallop Trim Border Punch, Blender Pen, Antique Brads, Very Vanilla Satin Ribbon

Thanks so much for stopping by!
Come again soon!

Smiles

Adele xxx

Friday, September 17, 2010

Using up those Scraps!

The DSP papers are so lovely that I can't bear to throw even the smallest scrap out....so I end up with a container full of off-cuts! I decided I better start doing something with them and that is how these two cards came about. Scraps are great for getting that eclectic feel...just glue a whole heap of off-cuts together and then neaten them up and whack them on a card! Or use your punches to punch out a whole heap of similiar shapes and then layer them to make flowers.
I am loving the new textured impressions embossing folders...the one I have used is Vintage Wallpaper. The sentiment on the top card is another favourite from a new set called 'Perfect Punches'...every sentiment matches a punch, which is sooo easy and quick!

More things to make....

Lisa xx

Tuesday, July 27, 2010

Finally....

I got to sit down last for the first time in almost 3 weeks and craft - and it felt FABULOUS!!!!!!!! We've been re-arranging our house and my craft stuff has been 're-located' and un-usable for the past couple of weeks and its been killing me, but finally I got to sit down in my new little space and start creating. Feeling a little rusty and these aren't the best cards i've ever made but boy, it was FUN!!!! Totally theraputic - I felt so happy making these cards...

And here they are...couldnt' decide which bad photo was worse than the others so you have them all :)


Obviously using the gorgeous 'Fox and Friends' set from the Autumn mini - I love this set but am a little flumoxed as to how to use it??? Basically just created my own dsp here with random stamping of some of the images in soft colours - I like all these colours together...

Stamps: Fox & Friends, Best Yet, Little Angel, Polka Dot Background
Ink: Certainly Celery, Barely Banana, Baja Breeze, Soft Suede, Pink Pirouette, Tangerine Tango
CS: Barely Banana, Baja Breeze, Sage Shadow, Whisper White, Pink Pirouette
Other: Big Shot Polka Dot Impressions Die, Blossoms Three Punch, Scallop Oval Punch, Large oval Punch, So Saffron Striped Ribbon, Ice Brads, 2 Step Bird Punch, Crystal Effects


Thanks for stopping by and come again soon!!!! Don't forget our project class this saturday if you're interested there are still a few spots left!!!

Smiles

Adele xxx

Tuesday, June 29, 2010

Paper Flower Tutorial Class

Hello and good morning!!!!!! Just a quick post to show you some of the cards (and FLOWERS) we will be making in this Friday's Paper Tutorial Class...


Sorry about the bad photography, but you get the picture right?? :) 7.30pm start, $15 to make all 6 of these cards and any extra flowers we get time to make...

Really hope you can make it. You can email me to reserve your place now...I can accept reservations any time until Thursday night...moneys are to be paid before Friday night where possible...

Thanks so much for all your lovely comments and support - I LIVE for my comment box!!!! hehehhe

Hoping you have the BEST day ever, and hope to see you on Friday night!

Smiles

Adele xxx

Friday, June 25, 2010

Baby Cards


So I don't know if I've ever really made baby cards, and I guess these aren't OBVIOUSLY baby cards, but the sentiment does say (if you can't read it) 'Welcome little one' which MAKES these baby cards right??? hehehehe

I really like these colour combinations - Kraft has to be one of my all-time favourites for a natural looking palette - LOVE IT!!! I tried making my own DSP again with the blue/pink and sahara sand stars which I really like...and a finishing touch - the big stars on the main panel have been SMOTHERED in Crystal Effects - just another little detail on an otherwise simple simple card...

Thanks for stopping by. Hope your day is going BRILLIANTLY!!!

Smiles

Adele xxx

CS: Kraft, Naturals Ivory, Baja Breeze, Pink Pirouette, Very Vanilla
Ink: Sahara Sand, Baja Breeze, Pink Pirouette
Stamp Set: Nursery Necessities
Other: Hemp Twine, Scallop Border Punch, Scallop Square Punch, Buttons Bouquet, Sponges, Paper Piercer,

Monday, May 31, 2010

Stamp-a-Stack Class Cards


Happy Monday everyone!!!! Just thought I'd post the four cards that we'll be making at our Stamp-a-Stack class this coming Saturday night. Cost is $15 to make 2 cards of each of these four designs which is really really good value! This class is open to anyone and EVERYONE crafty or not - come along and enjoy some good company and the opportunity to make some really cool cards too!

Payment needs to be recieved prior to Saturday in order to secure your seat. I can give you those details once you've contacted me about attending - you can do so either by leaving a comment or sending me an email (which you'll find to your right). If you'd like to purchase the lovely Stampin' Up! envelopes to go with your cards it will be an additional $5.

Really REALLY hope to see you there!!!

Smiles

Adele xxx

Sunday, May 23, 2010

One More Post


So one more post for tonight - I have been holding onto these two cards for a little while because I've actually sent one to a lovely lovely lady who sometimes frequents this blog (wave wave!!!!) and didn't want to give anything away until she'd recieved her little package, but I can't wait any longer because I really really like these cards...


These are both using the Vintage Vogue stamp set from the current mini - this is SUCH a fabulous stamp set - so very very VERSATILE and BEAUTIFUL and EASY to use...the card pretty much just makes itself.

I've started with a base of Natural's Ivory which I only bought after seeing how much Kirsty Brown uses it (I actually didn't even realise this cardstock existed till seeing this post) and I LOVE it - it is so lovely and natural and organic looking/feeling - then I've used a layer of Baja Breeze.
On the first card I have used the Medallion Stamp as a background, on the second card I've run the wheel that matches the Vintage Vogue set along the cardstock in versamark (have I told you how much I LOVE versamark as well!!! hehehehe). The rest is pretty much just stacks of the flower images from the Vintage Vogue stamped once, twice and a third time to create the different depths of colour in Baja Breeze and Sahara Sand, stuck together and a pearl or crystal stuck in the middle.

I love the very vintage-ey feel of these cards - I had a great time making them, and I really hope their recipients enjoy them too!!


Thanks for coming by!!!!

Smiles and more smiles,

Adele xxx

Circle Circus


So I borrowed Lisa's Circle Circus stamp set to have a play with (yes, it is STILL on my wishlist!!!) and this is one of the designs I came up with - I was in the mood for something clean and simple and I think this one is just that - simple simple simple!! All it uses is the Circle Circus stamp set, a circle punch and some ribbon pretty much. Don't you just love that ribbon though - its to die for!!! Unfortunatetly its out of our last mini so not currently available (I forgot that until right at this moment - SORRY!) but I really really like it - similar to the polka dot ribbons in the current mini catalogue in the new ink colours (Melon Mambo, Soft Suede, Rich Razzleberry) - who can resist such gorgeous ribbon!
This layout could easily be adapted to any colour scheme or stamp image don't you think?? :)
Thanks for stopping by,
Smiles,
Adele xxx

Thursday, April 22, 2010

A Mix of Cards


I had lots of fun trying out punches, papers and the Big Shot...and this is some of what I did...
Lisa xx

Thursday, March 18, 2010

Tags and more Tags!


Just a quick post today - a set of tags I've made using the same ruffled edge that I used in the card from the previous post.


These little darlings are going to a lovely friend going through a bit of a hard time...xxx

Thanks so much for stopping by!!!
Adele

CS: Whisper White, Barely Banana, Tangerine Tango, Bashful Blue, Pink Passion
Ink: Stazon Black
Accessories: Scallop Edge Punch, Crimper, Pastels, Blender Pens, Ribbon, Hole Punch

Saturday, March 13, 2010

Stationary Book


Well hello hello!!! It feels like a while since I've been able to post anything, but I hope you've been enjoying all Lisa's awesome projects!!!

My husbands good work friend was celebrating her 30th birthday today so I spent some time making this Stationary Book with matching 8 cards. I found the idea on here - you can actually buy a tutorial for it but I just had a look at it and thought I could work it out for myself. Its not too difficult and I actually really enjoyed how it turned out! I did have a little difficulty working out the boxes to go inside and have only just realised mine are quite different to the one's on Linda's sight, but that's all good right?? I also didn't make it big enough to take the matching 8 envelopes but ended up putting the envelopes into their own envelope of DSP paper and giving it as part of the gift? I wasn't about to make a whole new box just to fit the envelopes - next time I might just buy the tutorial!!!! hehehehhe


I have also tried out a technique I've seen on a few blogs to create that curly scalloped border around my central circle??? I couldn't tell you who to give credit to for it (if you know please let me know and I'll do a link!!) but its made by punching a strip of CS with your Eyelet Border Punch and then putting that through a crimper. I then put little snips into the base side of the strip and then just starting folding the little sections over each other to gather it into a circular shape. Then I've used mini glue dots to adhere my circle on top and popped it up on dimensionals. They look really simple but pretty too - why don't you have a go...:)


(I found out where I first saw this idea - Sarah Klass - go along and have a look a look at all her amazing things!!!)

Thanks for dropping by,

Adele xxx


CS: Kraft, Pumpkin Pie, Barely Banana
DSP: Haiku,
Stamp Sets: Happy Moments, Good Neighbours, Petal Pizzaz
Accessories: Crimper, Eyelet Border Punch, Paper Piercer, Versa Mark, Blender Pens